Showing posts with label delicious. Show all posts

Monday, 16 May 2016

Day 1012: Give us this day our daily sourdough

England has some really, really shite bread. The number one brand is Kingsmill but it's certainly not eaten by royalty and it's probably not really a mill, either. In fact, I wouldn't be surprised if the Kingsmill factory was just a room full of newspapers, wood shavings and disgruntled workers shoving small quantities of these into moulds before injecting them with air and dipping them into vats of bleach until the resulting product is so white you could squish several loaves together into a human shape, leave it on a beach somewhere in Alicante and have people assume it was an average British person. But hey, you are what you eat. Such is the nature of food culture in England that "healthy bread" means the same old shit that you used to eat but with a spattering of bran, not too much though or, heaven forbid, the kids will find out what real food looks like.

Some people try to convince themselves that they are actually healthy by buying brown bread, because they heard some spiel somewhere about whole grains. But companies in the UK are ahead of the curve on that one, and sell regular old white bread with a handful of other shit thrown in to make it LOOK like it's brown. "It's got 900 kinds of seeds in it! Wow!" Yeah...but is it brown? Is it fuck.
It is actually possible to buy wholemeal bread though, and you know it's the real deal because it's got a giant heart on it, in case you missed the memo about WHOLE WHEAT AND YOUR HEART. DID YOU KNOW IT'S GOOD FOR YOU, YEAH? But even if it didn't have a heart on it, you would know it was the healthy option because, just like brown rice and brown pasta, it offers not even a hint of the enjoyment of the unhealthy option and the eating experience is very much like gnawing desperately on an MDF table at 8am when the breakfast hunger pangs take you.
You might as well just give up and go for a bread that is totally devoid of any content whatsoever and designed entirely around toasting and slathering with butter (and this is England so I really mean it, get that knife in that butter block, or just, fuck it, put the whole butter slab on the toast and then add half a jar of Robinson's jam)

Sweden on the other hand, well, there is no other hand. In this respect England and Sweden really are similar. Sweden can boast as much as it likes about its class equality (most poor choices about food are linked to lack of understanding about good food, or economic inability to buy good food) but all that means is that theirs is a nation of people who really should know better about bread and who still buy the same old shit that their British neighbours do.


They also seem to fall for the same marketing tricks, believing that additional items ground into the loaf somehow magically make it more, well, magical. Like root vegetables. When have you ever been struck by the thought that your bread is missing something and that thing...is ROOT VEG?


Even if sometimes the bread comes in a different shape here, don't be fooled! It's still full of sugar. In England the bread is full of salt, some loaves have more than a gram per slice, but over here it's all about the syrup and the sugar. I confess I do enjoy a good rye or wheat cake, but I should have known what I was getting myself into when I saw the word cake...sugar by the bucketload!

This post was inspired by my search for a new daily bread, since moving to a new city we no longer have access to the delicious bread that was made in small, local factory that did its own deliveries. Now it's all about the big supermarkets and their big selection of SHITE. Everything is either bad, sourdough or a combination of the two with something experimental thrown in. Ah yes, sourdough. That's a big trend here. Everything is sourdough all the time. Especially when you don't particularly want sourdough. Here have some sourdough, it wouldn't be a complete blog post about Swedish bread without some.


Monday, 19 October 2015

Day 803: Make Simple Cider

Of all the things I thought I would miss from England, Cider was not high up on my list. But here in Sweden, Cider is a byword for shitty, sugary, fizzy syrup with a vague apple hint somewhere behind the sweetness. If Swedish cider is an annoyingly perky teenage girl who talks in incessant high pitched babble about vacuous nothing, then English cider is a wizend, contemptuous, sardonic old man who knows his way around a pub or ten and won't associate himself at all with the former.

As you may have read, a not-so sneaky apple thief came a-scrumping a month or so ago and I had no apples. Fortunately a friend, actually two friends, came to my rescue and rekindled my cider-making motivation. One friend knew where we could get some apples, and the other had the right kinds of bottles to store the maturing cider. If you know where you can get these two things, then you might benefit from my simple step-by-step instructions for how to make your own cider.

1. Get apples


We did not have the means to weigh our apples, but an educated guess puts these three boxes at around 60kg. They are autumn apples, as summer apples like the Transparence Blanche that my scrumping thief stole from my garden are no good for making pressed apple juice. Apparently they just bruise and taste bad.

2. Press apples


In Sweden you can look up your local musteri or juice press. For a small fee per litre they have the capacity to press the apples quickly and efficiently. We pressed ours at Vårdsätra Musteri and they produced 40 litres or delicious juice, ready to drink or brew into cider. You can press the apples yourself, there are plenty of tutorials online, but you need extra materials and lots of space and these factors put me off. It's supposed to be simple!

3. Freeze the juice


Your juice should not have preservatives in it and can go bad quickly. Therefore if you want to gather together the things you need and not feel rushed into brewing straight away you can freeze the juice and keep it for up to 3 months. Just make sure you thaw it completely and bring it to room temperature before you add any yeast.

4.  Buy yeast, a water lock and a siphon


This is a water lock (vattenlås, jäsrör) you can buy this and other useful things (such as larger containers if you want to brew more cider, bigger corks and lids, yeast and siphons) from www.humle.se. I brewed my cider in the plastic bottles provided to me by Vårdsätra Musteri and just bought the cap and water lock in the picture. You put water in the water lock (no shit Sherlock) and it lets the gas out of the cider while stopping air from going in and contaminating the cider. Make sure all the things you use are clean to avoid contaminating the cider.

As for yeast I bought Safcider Yeast for Cider because it was cheap and had a good tempearature range. My bathroom is always 20 degrees and that's right in the middle of this yeast's range.


I also bought 1 metre of plastic tube to use as a siphon, which is really useful for transferring the cider from the big bottle to small bottles without all of the yeasty crap following along.

If you live in England, you can buy all of these things really, ridiculously easily. Even Tescos and Wilkinsons sell home brew kits.

5. Add sugar and yeast to the apple juice


If you want to be precise, you can also buy a Hydrometer to measure the alcohol content of your cider and to work out how much sugar needs adding.

If you are impatient, like me, and just want to see how it turns out, then add some white sugar (I added 100g to my 5L batch, I will let you know how it turns out!) to your apple juice and then add some yeast (a 5g packet like the one above is good enough for 20-30 litres) and then guess how alcoholic it is at the end when you drink a bottle and fall over (or not.) According to some websites, if you add no sugar at all you will end up with 5-6% alcohol in your cider.

Put your airtight waterlock on the bottle.

6. Let it ferment for 1-2weeks

I left mine in the bathroom for 10 days at 18-20 Degrees. I knew it was working because some froth formed (and left the brown smudge on the neck of the bottle) and for a few days in the middle you could hear the "sploop" of the air escaping from the lock. After 10 days I knew it was done because the air sploops had stopped.

7. Sterilise some containers to put the cider in


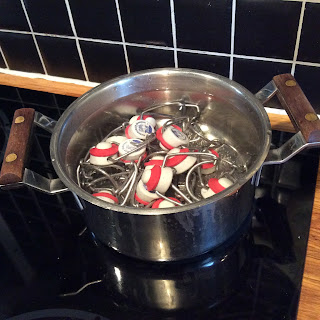
I was able to get my hands on some Czech and German beer bottles with resealable rubber/metal/ceramic lid contraption dealies. I boiled the lids to sterilise them, for 10 minutes on a rolling boil.

As for the bottles themselves, I soaked them in soapy water for 10 mins to remove the labels and then baked them for 20 minutes at 120 degrees to sterilise them.

I let them cool completely before putting any cider in them!

Some people re-bottle the cider in another large container and let it sit a bit longer before bottling, just to get rid of the dead yeast and make sure the cider is really ready.


 Since my cider had completely stopped making any bubble noises, I decided to put it straight into bottles. This may or may not be a giant mistake, watch this space...

I took the bottling process as an opportunity to try the cider and it tasted ok, like the old man mentioned above but maybe not quite wizened. I hope me comparing the taste of cider to the taste of an old man isn't putting you off completely.

And now I wait, to see if some time sitting in bottles in my basement will make the flavour mature at all, or just turn all my hard efforts into vinegar.